Bp Allied Settings - MPSettings.exe
MPSettings.exe contains the settings that are used to customise an installation of Bp Allied. Some of these settings are editable within the Options in the Bp Allied User Interface.

Changing the settings within MPSettings.exe could seriously affect how Bp Allied functions. Please DO NOT change any settings without the guidance of the Bp Allied Support team. Please call, email or log onto
remote support if you are experiencing technical difficulties with Bp Allied. Contact details are located in the footer of the Bp Allied Help.
Please also note that the details in this section still refer to a Solo edition of myPractice. As of Version 4.2 there is no longer the option to install a Solo edition of myPractice. However, as there are still a number of installations of a Solo myPractice we will continue to include the relevant MPSettings.exe details in here.
Please also note myPractice was rebranded Bp Allied from version 5 onwards.
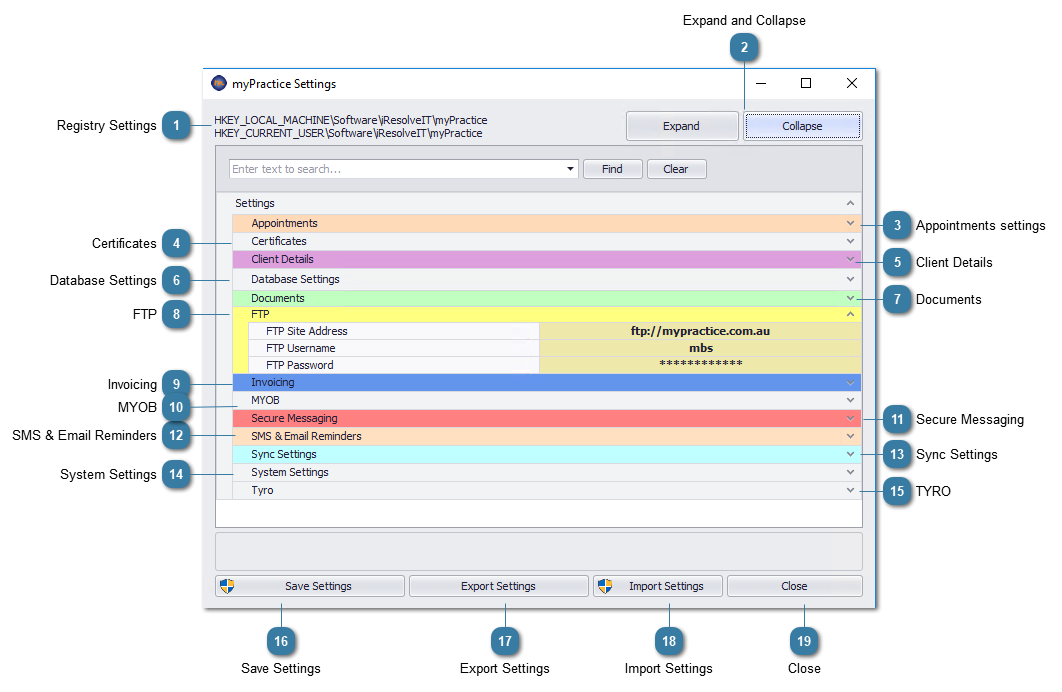
 Registry SettingsThis is the location of the registry settings that are being loaded into MpSettings
|
|
 Expand and CollapseUse to expand or collapse all the sections.
|
|
 Appointments settings |
|
 CertificatesGo to details on Certificates
|
|
 Client Details |
|
 Database Settings |
|
 Documents |
|
 FTPFTP Settings used to download DVA and MBS Schedules from the Bp Allied website. The details in here should not be changed otherwise the download will not occur.
|
|
 Invoicing |
|
 MYOB |
|
 Secure Messaging |
|
 SMS & Email Reminders |
|
 Sync Settings |
|
 System Settings |
|
 TYRO |
|
 Save SettingsIf changes have been made, click Save Settings.
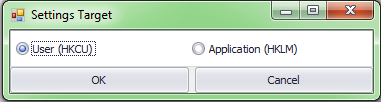
The Settings Target window will display
Settings need to be saved in two places in the Registry - HKEY Current User and HKEY Local Machine so the Save Settings option is clicked twice.
1: Leave the radio button on user, Click OK. Click OK to the Saved Settings dialog box.
2: Click Save Settings again, click Application and OK. Click ok to the Saved Settings dialog box.
HKCU = HKey Current User - any user logged onto the computer can update these fields for their own computer profile ONLY. If another person logs into the computer, they will not see these settings.
HKLM = HKey Local Machine - the user requires Administrative rights to update these fields. These are usually set when the application is installed (but not always).
|
|
 Export SettingsExports settings to the desktop and saves them as MPSettings.bin
|
|
 Import SettingsImports an MPSettings.bin file.
Note: if this is imported into a re-install of Bp Allied which is running a different version of Windows then all of the file paths will need to be changed.
|
|
 CloseClick to Close the window. This will also discard any changes.
|
|